
There are a lot of really great gluten-free snack foods on the market these days: potato chips, crackers, tortilla chips, cheesy puff type things, and even pretzels. The one thing I’ve yet to come across, however, is a gluten-free cheese cracker. It seems like such an obvious thing to recreate. Cheese crackers were always among my favorite snack foods. I remember mindlessly downing entire bags of Goldfish during late night sessions of Facebook stalking paper writing in college. How can they not exist yet in gluten-free form?
A few weeks ago I came across this post from Deb. A couple weeks later I somehow wound up on another site looking at a similar recipe. Forget waiting for them to show up in a box on a shelf somewhere—it was time to bake up a batch of cheese crackers myself.

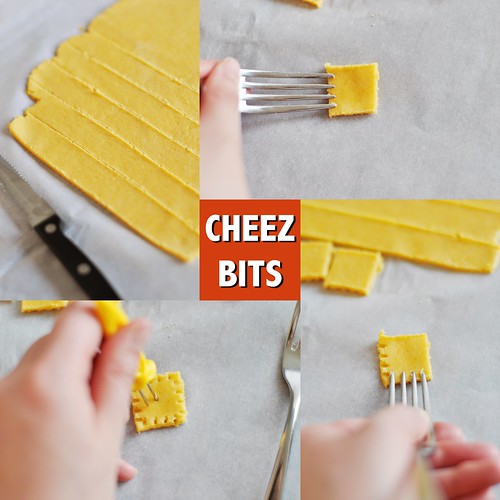
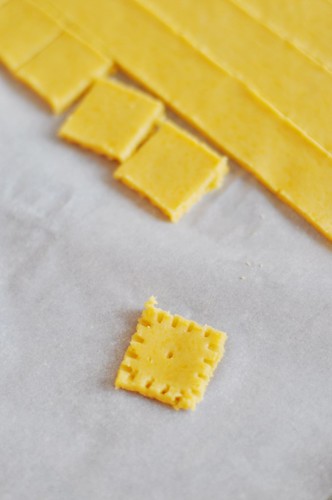
These cuties come together so quickly. Simply work all the ingredients together in a food processor, chill the dough, roll it, cut, and bake. I got a little precious with mine—using the tines of a fork and a corn skewer (we were out of toothpicks) to make them look like classic Cheez-Its—but simple squares or fun shapes from tiny cookie cutters would work as well.
Like many things, the quality of your end result is only going to be as good as the ingredients you put in it. Choose a nice, sharp cheddar cheese and grate it by hand or using the disc attachment on your food processor. No matter what you’re making, this will always taste better. The cheese that comes pre-grated in a bag is coated in disappointment and regret to keep it from sticking together*, and those are two ingredients that I prefer to leave out of my crackers.
That said, if you buy the pre-grated stuff, I’ll never know. Do what you gotta do.
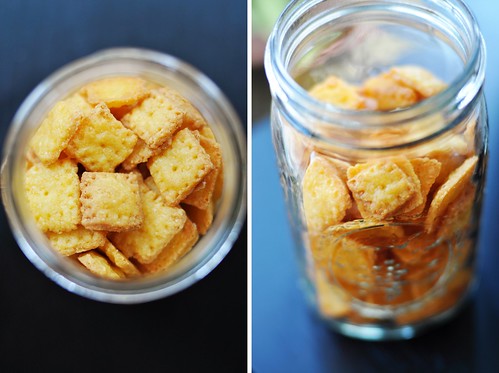
The flavor of these Cheez Bits, as I’m calling them, is actually very similar to their look-alike, but the texture isn’t quite as floury as the ones I remember. They feel more like a cracker and frico got together and had a crispy little baby—or as Chris so perfectly put it: “Like Cheez-Its, only better.”
Cheez Bits
Adapted from Smitten Kitchen & Savory Seasonings via Country Living
Makes 15 dozen crackers
½ cup / 2.1 oz millet flour
¼ cup / 1.4 oz brown rice flour
¼ cup / 1.05 oz tapioca flour
¼ teaspoon xanthan gum
½ teaspoon Kosher salt
8 oz grated cheddar cheese
4 tablespoons / 2 oz (1/2 stick) cold unsalted butter, diced
3 tablespoons / 1.5 oz cold water
Preheat the oven to 350 degrees. Line a baking sheet with parchment paper or a silpat.
Place the millet flour, brown rice flour, tapioca flour, xanthan gum, and salt in the bowl of a food processor. Pulse a few times to combine.
Add the cheese and butter to the flour mixture and pulse until it resembles a coarse meal. Add the water, one tablespoon at a time, and pulse until the dough comes together into a ball. Divide the dough in two (it’s easier to work with in smaller batches) and shape into discs. Wrap each disc in plastic wrap and refrigerate for at least 20 minutes.
Place a piece of parchment paper on a work surface. Remove one disc of dough from the refrigerator and roll out to 1/8-inch thick. If making squares, trim off the jagged edges of dough and use a serrated knife to make vertical slices 1-inch apart. Then, make horizontal slices 1-inch apart to create the squares. Optionally, use the tines of a fork to crimp the edges of the crackers and a toothpick to create a hole in the center. If using cutters, cut out desired shapes. Transfer cut crackers to the prepared baking sheet, spacing them at least half an inch apart.
Gather the remaining scraps of dough, re-roll, and cut additional crackers. If the dough has gotten very warm, re-wrap the scraps and place in the refrigerator for a few minutes to chill. Continue rolling and cutting until all the dough has been used.
Bake the crackers for 10-15 minutes, until the edges are golden. After removing them from the oven, sprinkle the warm crackers lightly with Kosher salt, if desired. Allow to cool before eating.
While best on the first day, the finished crackers may be stored in an airtight container for several days. Because of their high cheese content and lack of preservatives to help them along, they can tend to get a little stale. They still taste great, though, and if you give them a couple minutes in a 250-degree oven, they should crisp right back up for you.
*Not intended to be a factual statement.