
I’m one of those cooks that likes to use every last bit of something. Well, I try to be one of those cooks. Okay, so the truth of it is more like: I really want to be one of those cooks. I have bones in my freezer from months and months ago that I fully intend to make into stock…one day. And if someone can give me a use for the liquid that I strain out of my homemade yogurt each week, I will be eternally grateful. See? I’m working on it. And a recent endeavor made me aware of one thing that I will now be saving to bring myself closer to full-blown domestic goddess status: egg yolks.
I’m long past the days of cooking up egg whites only–those orange-yolked farmers’ market eggs are just too darned tasty and nutritious. I do, however, like to add about one egg white for every two whole eggs that I scramble in the morning. It helps to make them extra light and fluffy. Also, my bread dough recipe, which works as pizza dough and much more, calls for a couple egg whites (Heads up: don’t go scouring the recipe index–it’s not there. I’m saving this one.). This, of course, leaves me with a decent amount of yolks. Except, they haven’t really been left with me so much as tossed in the garbage along with the shells.
And then I started working on that angel food cake. Two or three yolks are easy enough to forgive, but as I stood there separating a dozen eggs, the thought of throwing out so many perfectly good yolks made me cringe. Some of them went into the pastry cream for the Boston cream pie and the rest, after a little internet searching, were used up in a gluten-free version of this 7-yolk pasta dough.
How did it come out? Let’s just say I no longer have any issues with saving every last yolk. (Check out StillTasty.com for tips on how to freeze yolks for later use.)
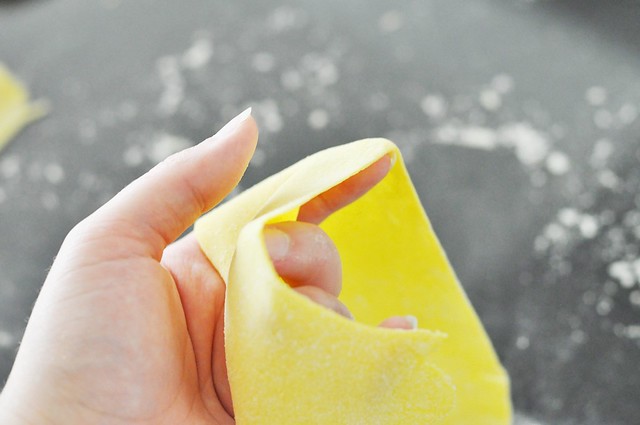
The dough comes together using the traditional well method, gradually stirring in the flour until it won’t take on any more and then kneading in a bit more until it’s firm yet workable. It rolls out thin. Crazy thin. I can see my countertops and fingers through it thin. And it cooks up into a firm pasta with a really nice, balanced flavor–rich from the yolks, but not tasting too much of this flour or that.
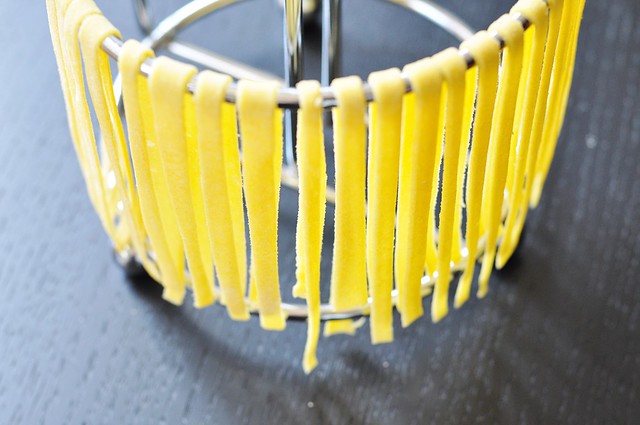
The first time I made this pasta, I left it in sheets, stuffed it with dollops of Jennie’s homemade ricotta, and punched out dozens of pillowy little ravioli. That was a really good dinner (she said staring off nostalgically). The next time, I simply hand cut it into fettuccine and tossed it with a little oil, some torn basil leaves from the garden, and a handful of coarsely grated Parmigiano. Perfection.
I will say that it is a bit of work to roll out using only a rolling pin–especially if you’re making ravioli and keep re-rolling the scraps. It’s enough to make me want to purchase a pasta roller. But really only so I can get it in my mouth faster. There’s no way a little elbow grease is going to keep me from making this pasta again and again.
7-Yolk Pasta Dough
Adapted from Smitten Kitchen
3/4 cup brown rice flour
1/2 cup millet flour
1/2 cup tapioca flour
1 1/2 teaspoons xanthan gum
Pinch Kosher salt
6 large egg yolks
1 large egg
1 1/2 teaspoons EVOO
1 tablespoon milk
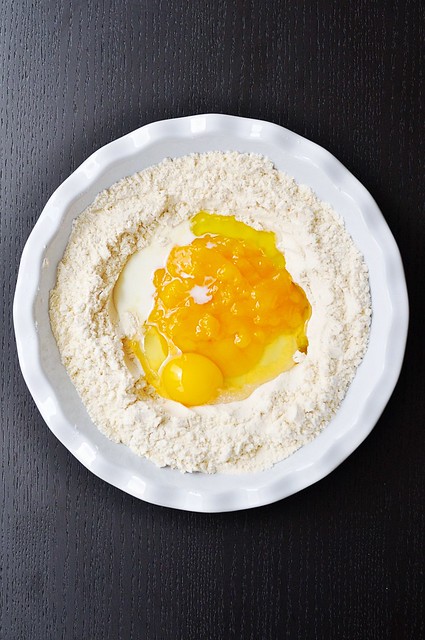
In a broad, shallow dish, like a pie plate, whisk together the flours, xanthan gum, and salt. Make a well in the center of the flour mixture and add the remaining ingredients to the well. Use a fork to break up the eggs and mix them together with the milk and oil. Using your fingers, in a circular motion, slowly incorporate the flour from the sides of the well into the eggs.
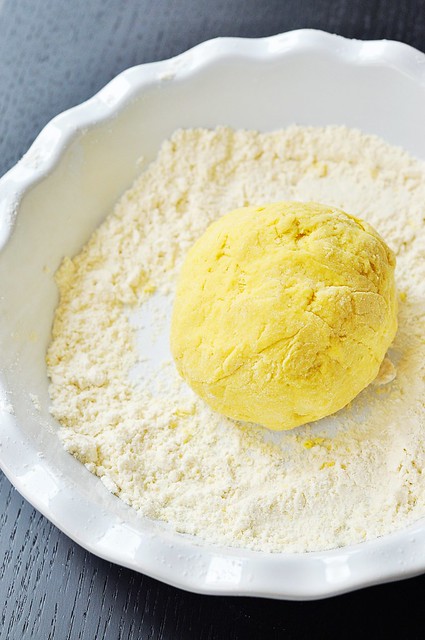
Once the dough starts to take shape, continue incorporating more flour by sprinkling it generously over the top of the dough and kneading it in. The dough will become firm and seem a little dry. At this point, use some of the excess flour in the pie plate to flour a work surface and continue kneading a bit more flour into the dough on the work surface. The dough will smooth out a little, appear a bit less dry, but will still be quite firm. Wrap it in plastic wrap and let it rest in the refrigerator for at least 15 minutes or up to 1 hour.
You will have excess flour left over, roughly 1/3 cup. Pass this through a sieve and reserve it for dusting the dough/work surface when rolling out the pasta.
Remove the dough from the refrigerator and cut it into quarters. Work with one piece at a time, keeping the rest wrapped in plastic. If using a pasta roller, flour the dough as needed and proceed as with regular pasta. If not using a roller, dust a work surface with the excess flour and use a rolling pin to roll the pasta very thin, continuing to flour as needed and lifting the dough off the work surface often to keep from sticking. The dough can be rolled thin enough that it will border on translucent. Keep in sheets for making ravioli or lasagna, or, if desired, cut into long pasta (tagliatelle, fettuccine, linguine). Lay long-cut pasta flat or hang so that it does not stick together; once it’s been allowed to slightly dry out for a few minutes, it will be fine if gathered and set aside or sealed in a food storage bag.
If using to make a lasagna or ravioli recipe, cook as directed, otherwise cook the pasta in heavily salted boiling water for 3-5 minutes. Prepared, uncooked pasta or dough will keep for a few days in the fridge, or can alternately be frozen for a couple months.